Libreboot on the ASUS Chromebook Flip C101P: Disable write protection
Table of Contents
Libreboot is a coreboot distribution, that supports a bunch of devices. Among many x86_64 devices, you can also install on two ARM-powered Chromebook. One of these Chromebooks is the ASUS Chromebook Flip C101p, and since I did not find a proper guide on how to disable firmware write protection, a necessary step before installing Libreboot, here's a stab at providing one.
The device
Skip this if you know the device.
The Asus Chromebook Flip C101p (Codename gru-bob) is a convertible, 10" mini-notebook, introduced in 2017 and powered by the Google OP-1 (OP may stand for "online processor" according to Martijn, which is hilarious!). The OP-1 is essentially a rebranded Rockchip RK3399, so quite familiar, well supported hardware. It's small but still has a keyboard I find nice to type on, and I've had a few of these previously. The IPS screen is not particularily amazing with its 1280 × 800px resolution, but my shorter, long ago experience with both the Samsung Chromebook Plus (gru-kevin), which has a 2400 × 1600px screen, and to a lesser degree, the FullHD PineBook Pro led me to believe that it's a good choice for the SoC: It feels quick!
It ships with ChromeOS, and the final release of ChromeOS to support it was 116 - the device is EOL'd, no longer supported by Google.
Fortunately, you can boot quite a few (GNU/)Linux distributions on the thing, and have been able to do so for a long, long time:
- InstallingDebianOn/Asus/C101PA - Debian Wiki
- Releases · SolidHal/PrawnOS
- Maccraft123/Cadmium
- imagebuilder/systems/chromebook_gru/readme.md at main · hexdump0815/imagebuilder
- Asus Chromebook Flip C101PA | Arch Linux ARM
- Libreboot – Installing ArchLinuxARM on a Chromebook with U-Boot installed. Additional instructions for Libreboot.
- postmarketOS // real Linux distribution for phones
Why Libreboot?
You can boot all of these projects without installing Libreboot, so why?
Simple. You'll have to be in developer mode, and everytime you turn on your device, you will have to press Ctrl + D or Ctrl + U quickly enough, to avoid a really annoying sound. Now, that ChromeOS is no longer supporting the device, it makes even more sense to have smooth booting to Linux!
In order to flash other boot firmware to a Chromebook, it has to be put into developer mode. Also, you need to turn write protect off.
Unlike newer ChromeOS devices, the C101p still has a write-protect screw, and according to other reports, it also has the newer CR50 protection, so that you will need a so called Suzy-Q cable or disconnect the battery. The following guide does not need a Suzy-Q cable, as I do not have one.
Things to do first
- Enable developer mode as outlined here.
- Have a USB thumb drive or microSD card ready - if you want to, you can download Libreboot onto it: The newer releases (I used 20240225) are in testing. Optionally, also get a USB keyboard, since you'll need to type things with an opened device.
- Follow this guide to open the C101P (first 5 pictures, it's for the older RK3288 sibling, the C100P).
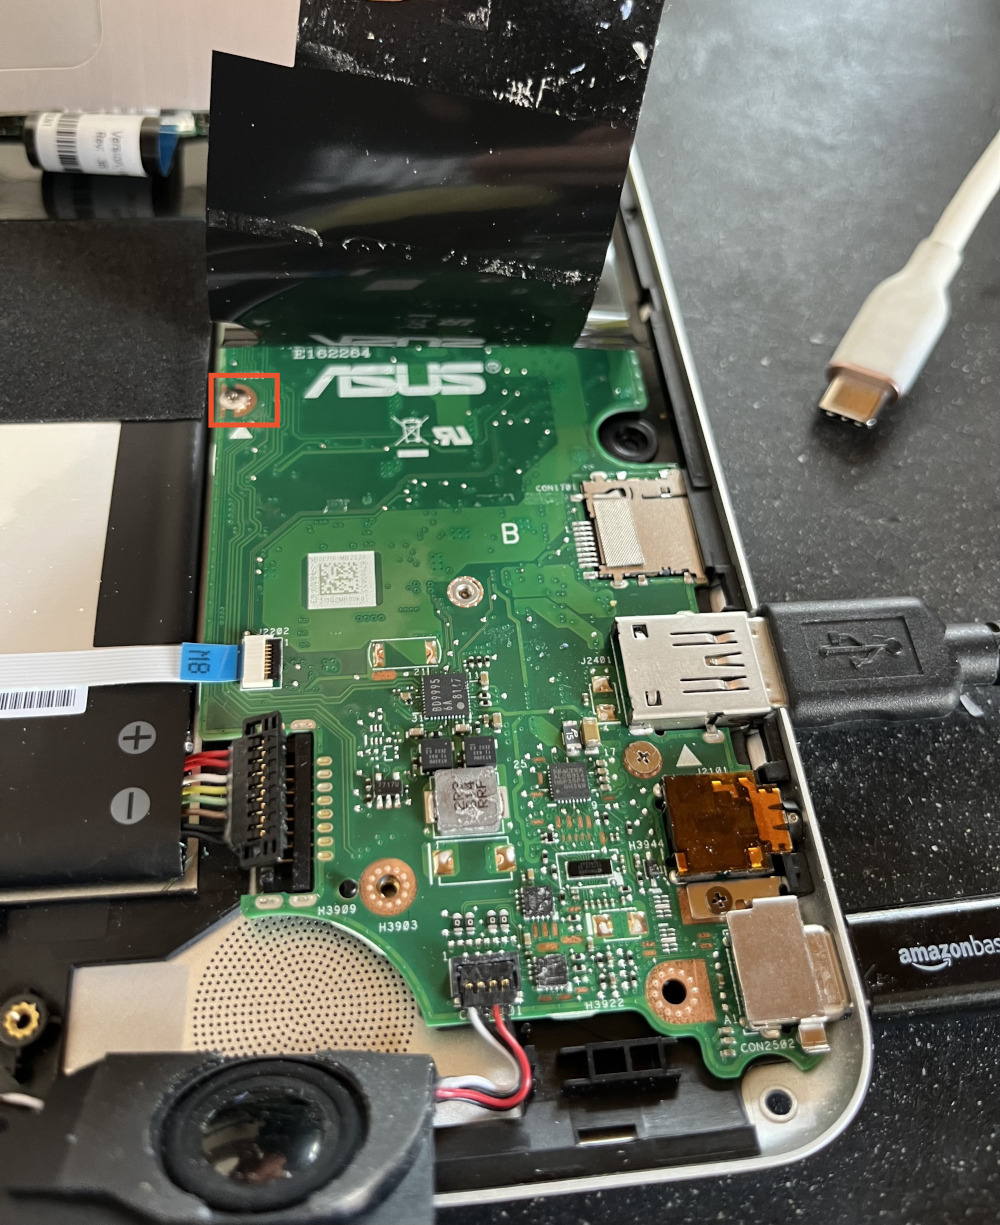
Unplug the battery and remove the write protect screw
To unplug the battery, you have to first remove the speaker on the bottom right, it has two Philips-head screws (make sure to put them somewhere else than the screws you removed before opening the case, as they look similar, but are different ;-)).

Having the speaker unscrewed, gently pull it aside. You can now unplug the battery by lifting the connector up (I used my screw driver, some plastic object is recommended instead).

Now, it's time to find the screw. It's the one to the right side of the battery, or next to the ASUS logo, if you remove the black protection layer from the mainboard (which you don't need to).
With all that done, you can connect power to your C101P and boot it up. An external keyboard can come in handy to type things, if you are careful and have not removed the top cover, you can probably do without.
Boot into into guest mode, press Ctrl+ Alt + T to bring up the terminal, enter shell.
I then cd'd to my USB drive (to have a writeable directory to back up the original boot loader) and then followed the Chromebook flashing instructions on Libreboot.org.
I've then booted into a downloaded postmarketOS image and installed postmarketOS to the eMMC via pmbootstrap, and am quite happy so far, despite having suspend issues (on lid close) to figure out.